PLUS Six Examples of Custom Object You Can Make in HubSpot
Does it ever feel like no combination of custom properties, lists, and workflows can solve a particularly important reporting or automation challenge?
Many organizations find themselves in a position where they need to store a significant amount of data unique to their organization and their industry, which cannot be easily managed using custom properties alone.
The solution? Custom objects! These can be created in your HubSpot enterprise portal and can be associated with existing contacts, companies, deals, tickets, and even other custom objects!
 Custom objects interact with many of HubSpot's tools and automation features the same way that standard objects do. You can create custom properties for your custom objects, and customize your record views and default required properties. Custom objects are available in workflows, with options to create workflows based on your custom object and also set up triggers for native object workflows that references an associated custom object. Logic branches can also reference custom object data and data from associated objects.
Native Objects Are Often All You Need
As a best practice, we recommend using a native objects in HubSpot over a custom object whenever possible. There are plenty of good reasons to rely on native objects instead of custom objects. HubSpot also recently introduced custom association labels, allowing you to create additional relationships between contacts, customers, deals, and tickets. A few caveats before you decide to implement custom objects:- Introducing custom objects also introduces additional complexity in your segmentation, reporting, and revops in general.
- HubSpot affords special functionality to native objects that may be more limited or slightly different with custom objects
- Native objects get the newest features and updates first, sometimes without an available or guaranteed timeline
Again, you should ONLY use a custom object when it is absolutely necessary.
When Is a Custom Object The Right Solution?
Still, there will be times when sets of custom properties just aren't flexible nor powerful enough to provide the dimensions you need to segment your reports and manage automation. A custom object is helpful when:
- The native relationships between native objects are not sufficient
- Two or more native objects need to share data across records
- The number of custom properties for a topic or data set is relatively large (more than 20 is a good starting number)
- You are integrated with another CRM like Salesforce and are already using cusotm objects
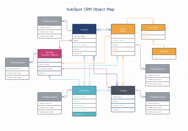
HubSpot Object Map
Set your strategy for CRM object relationships and data properties in HubSpot.

So, what does this actually look like in a HubSpot portal? Below are some real examples of custom objects that we have helped organizations create and utilize.
Examples of HubSpot Custom Objects
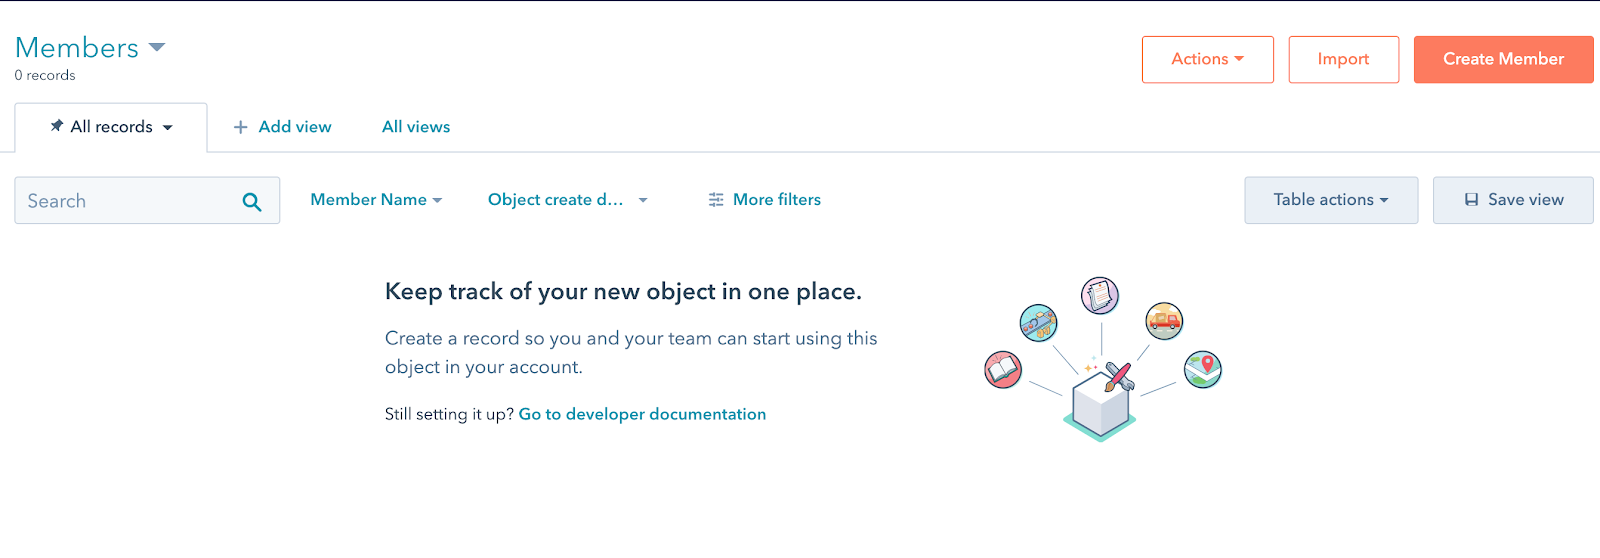
Custom Object for Members
Storing member information requires a complex data structure to take full advantage of automation and reporting in HubSpot.
- Member ID
- Member start date
- Member status
- Member renewal Date
- Member recurring fees
- Badges - All
- Badges - Active
- Topic interests
- Product usage and statistics
- Subscription source
Custom Object for Partner (or Referral)
Many organizations sell with partners or have referral programs, and utilizing a custom object for this data allows you to track revenue by partner and keep partners updated on deal progress.
- Partner ID
- Partner tier
- Partner notification preference
- Partner referring revenue
- Partner status
- Partner source
- Partner create date
Teams Custom Object
Using a custom object for teams that is associated with your contacts lets you group contacts together for sending communications, reporting, and tracking engagement.
- Team ID
- Team name
- Team creation date
- Team role
- Team status
Franchise Custom Object
Manage sales and relationships with franchisees and franchisors using two or more custom objects that work together to associate related records.
- Franchise ID
- Franchise locations
- Number of franchises
- Franchise status
- Franchise sales
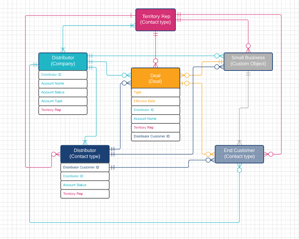
Custom Object for Distributors
Manage distributor relationships with custom objects, optionally handling end customer data with contacts as well.
- Distributor ID
- Distributor region(s)
- Distributor location(s)
- Certified distributor status
- Products carried
- Eligible for bulk shipping
Custom Object for Attribution or Campaigns
Organizations looking for advanced campaign tracking and attribution can use custom objects to create a campaign structure and then utilizing workflows to associate contacts and update statuses. This data can be augmented using UTM parameters in HubSpot or HubSpot custom event tracking.
- Campaign name
- Campaign status (active, complete)
- Campaign start date
- First campaign activity date
- Last campaign activity date
- Marketing asset type
- Campaign engagement source
How to Create a Custom Object in HubSpot CRM
HubSpot provides an easy tool to define and create new custom objects in your portal - with no coding required!
Step One: Navigate to Custom Objects in Your Settings
Jump into your HubSpot portal and navigate to your settings. You’ll do this by clicking the cog wheel in the top right hand corner of your screen, right next to your profile.
Once in your settings, skim the left hand navigation bar for “Objects” and click the dropdown arrow. From here, you’ll see “Custom Objects” as the last option in the list. Go ahead and click it.
You’ll be presented with a screen that includes linked text to “create a custom object”. Upon clicking this link, you’ll be brought to a HubSpot Developer’s API doc [link to: https://developers.hubspot.com/docs/api/crm/crm-custom-objects] .
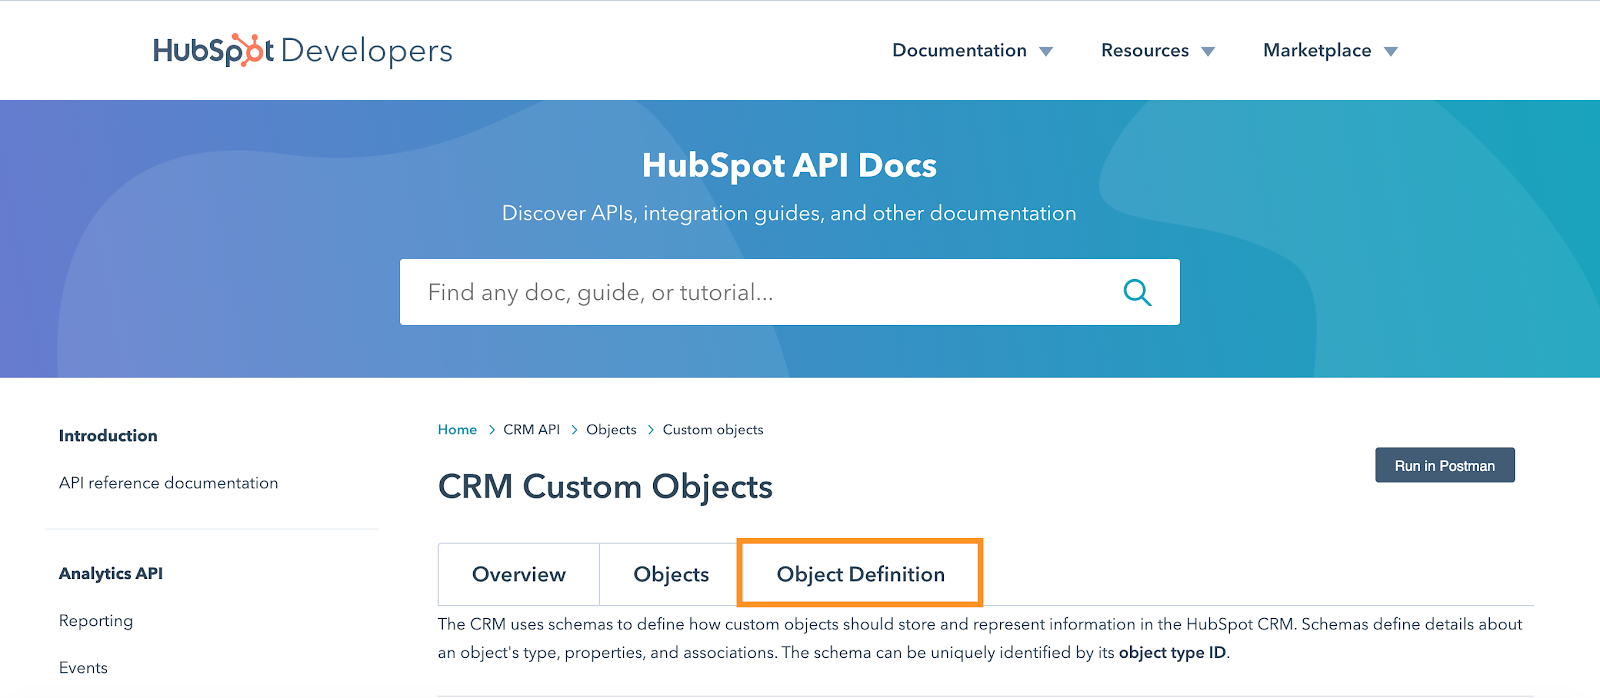
Step Two: Create a New Schema for your Custom Object
From here, click over to the “Object Definition” tab and click on the dropdown immediately below. Choose the option to “create a new schema”.
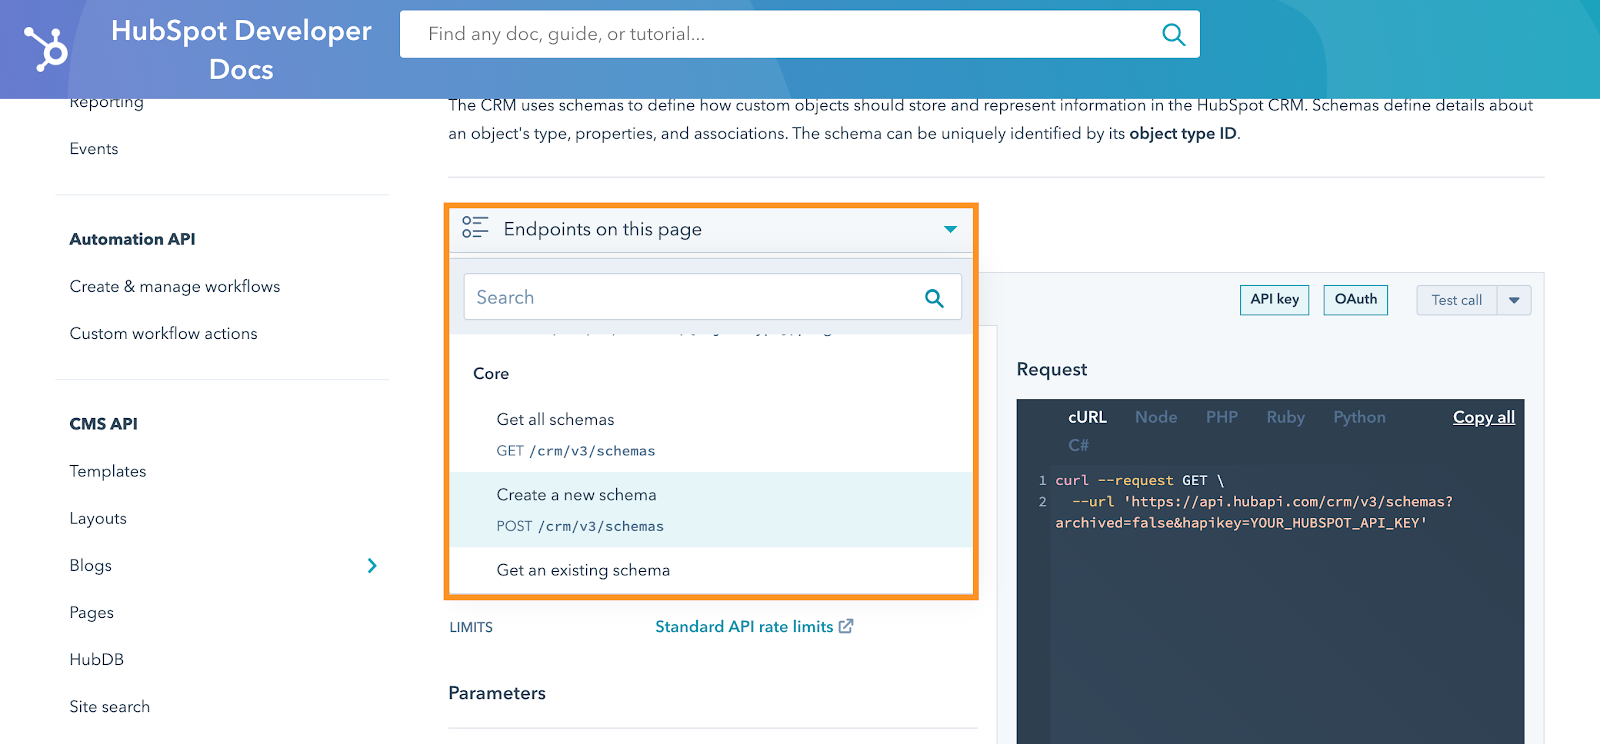
Using this “create a new schema” option is how you’ll create your custom object.
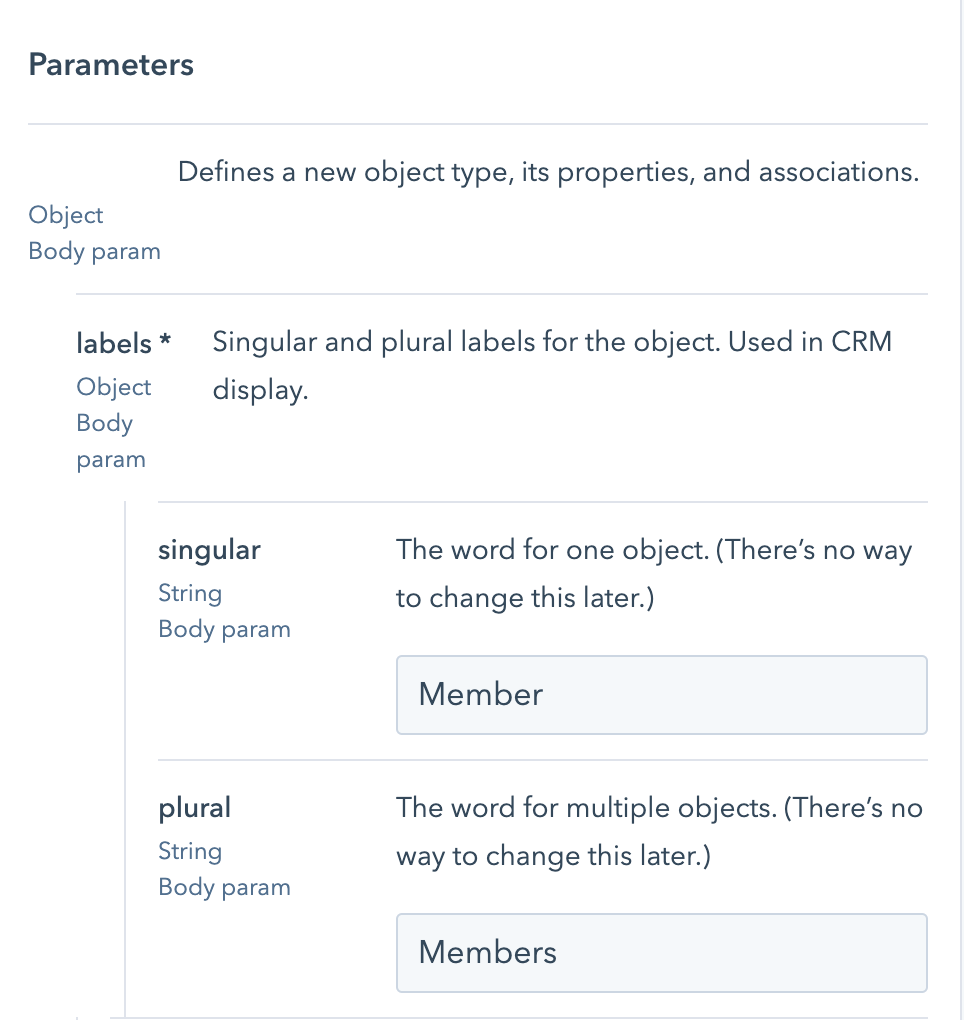
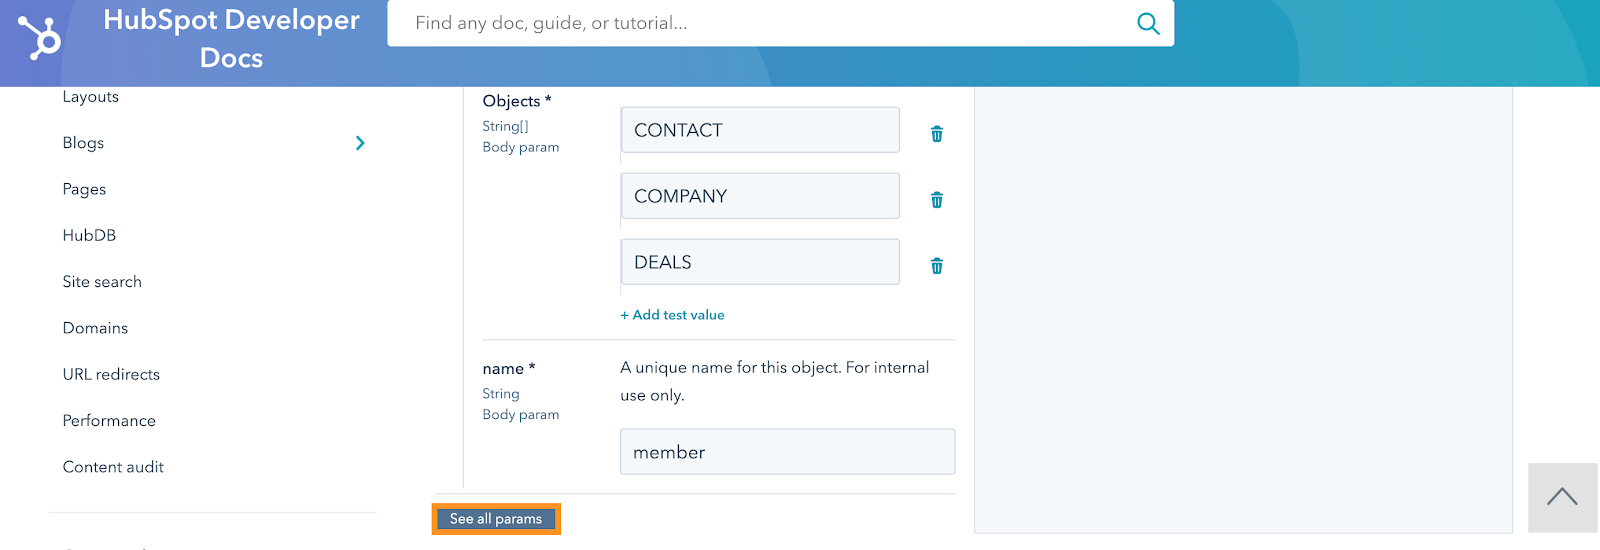
Scroll down and begin inputting the labels for your new object into the fields below.
Thankfully, HubSpot offers some helpful context around each label, like where it will be used or how it will be displayed.
Though, you’ll want to be certain you’ve input text across the following labels, as they’re required:
1. Singular--The word for one object.
2. Plural--The word for multiple objects.
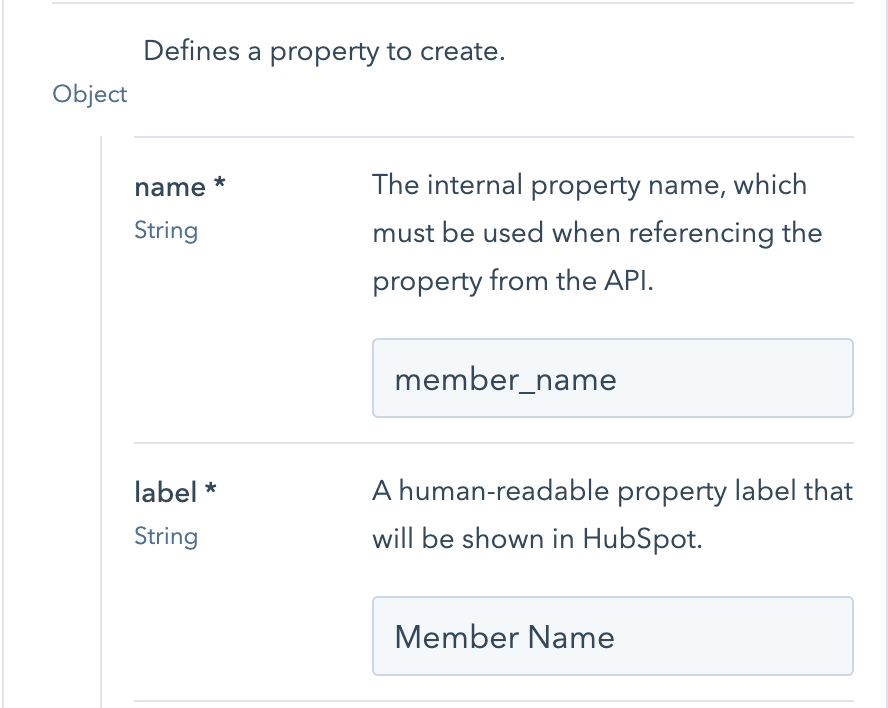
3. Required properties--The names of properties that should be required when creating an object of this type.

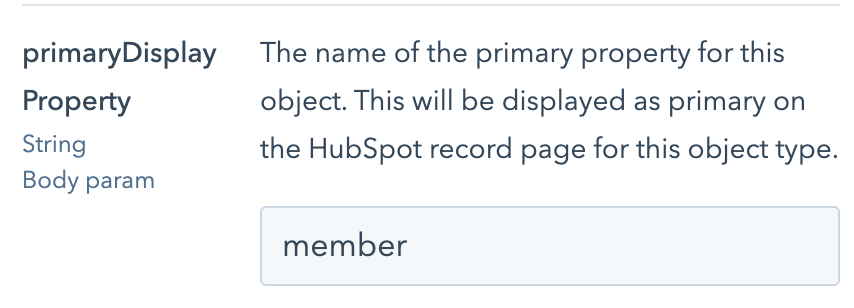
4. Primary Display Property--The name of the primary property for this object. This will be displayed as primary on the HubSpot record page for this object type.
5. The object Name and Label.
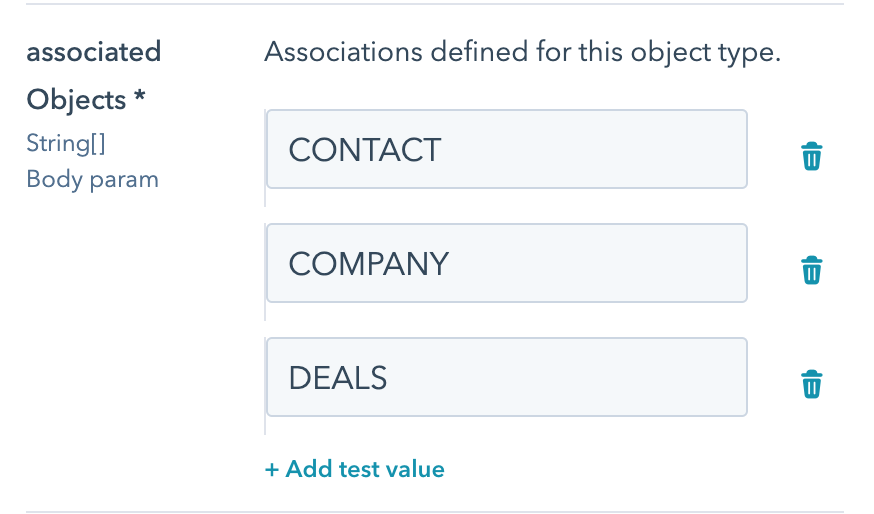
6. Choose objects you’d like to associate with your new object, like Contacts, Company, and Deals.
7. And the internal name for the object.

IMPORTANT: If you don’t see all of these parameters available from the get-go, be sure you’ve clicked the button “See all params” towards the bottom of the label fields.
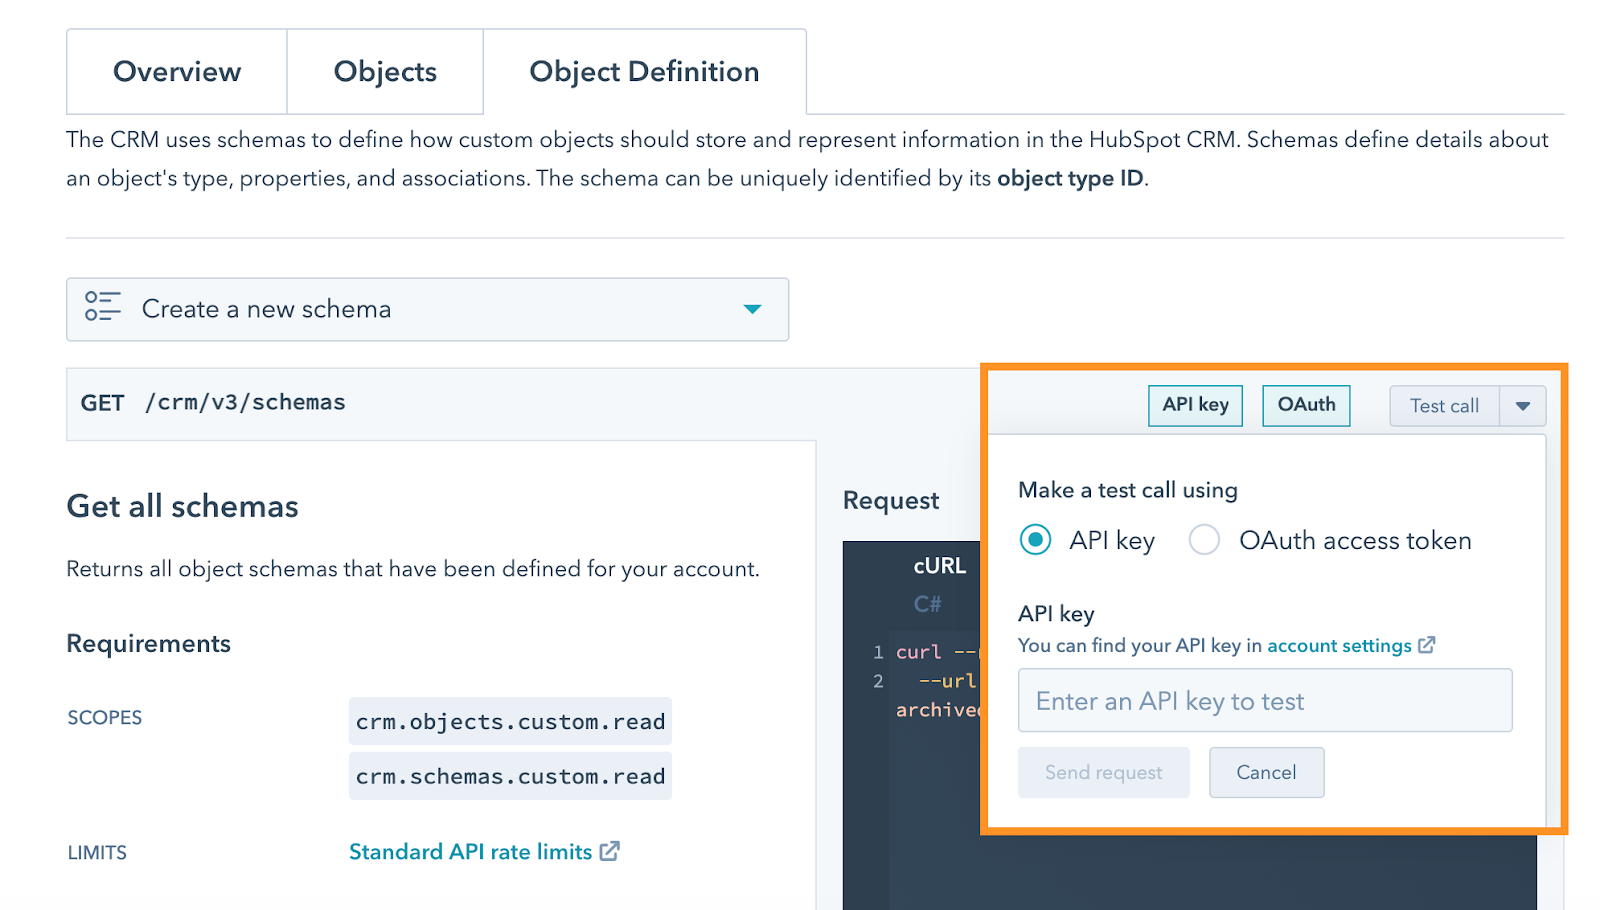
Step Three: Run a Test Call
Scroll back up towards the top of the page, and click the button on the far right to run a “Test call”. Add in your API key, send the request, and then finally confirm POST request.
Step Four: Confirm that the Custom Object is Now Available in Your Portal
Jumping back into your HubSpot portal, you can now search for your new custom object across your associated objects.
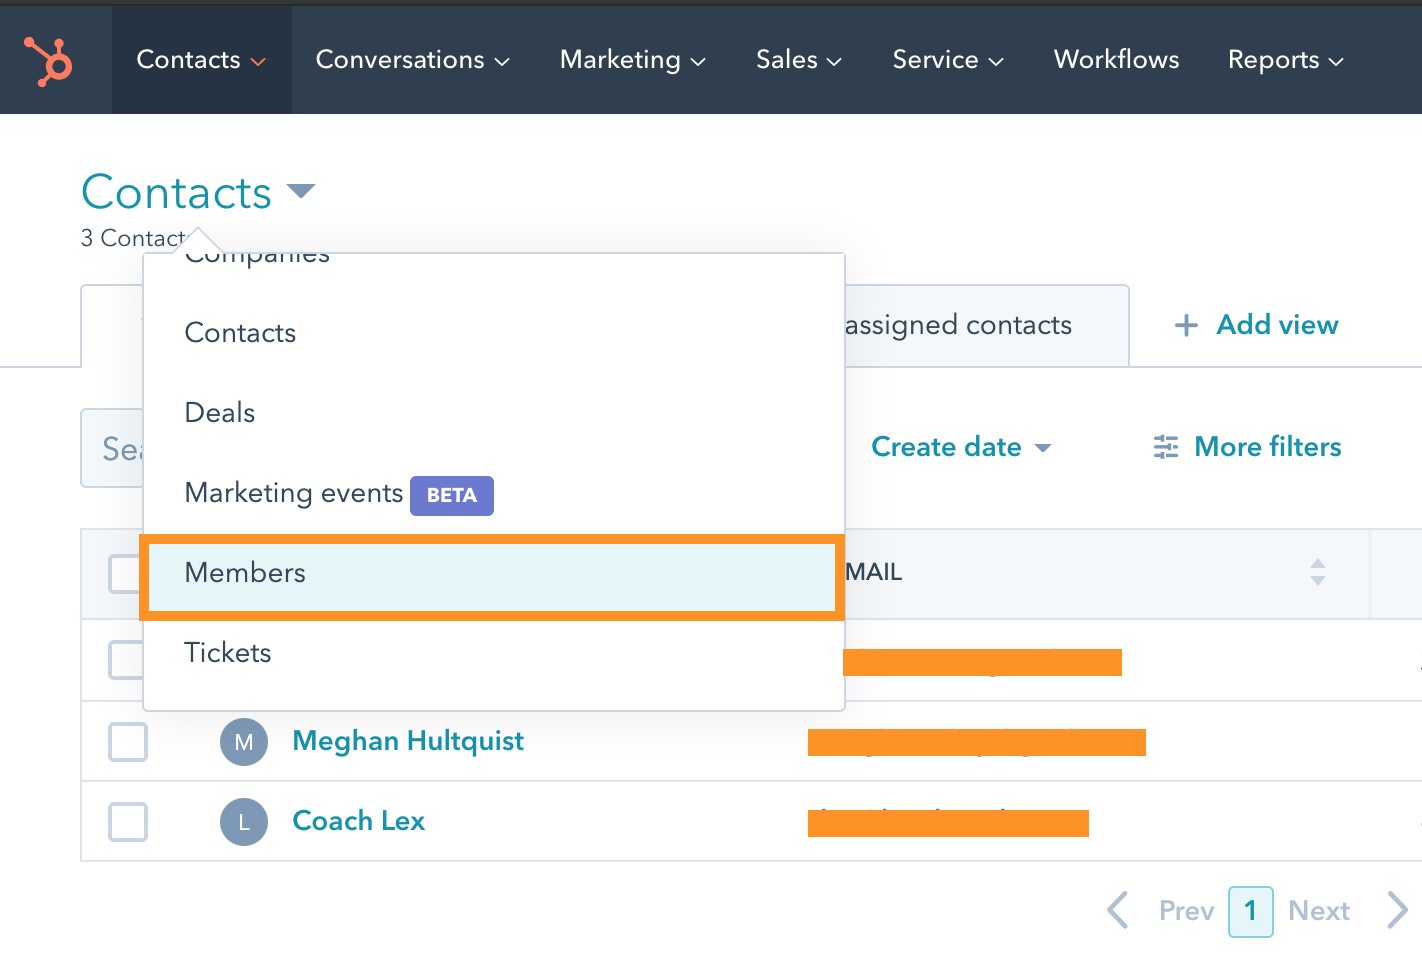
So, let’s take a peek at our Contacts dashboard. If we click the dropdown, we can see that “Members” is now available.
And, from the Members view, we can now create new members!
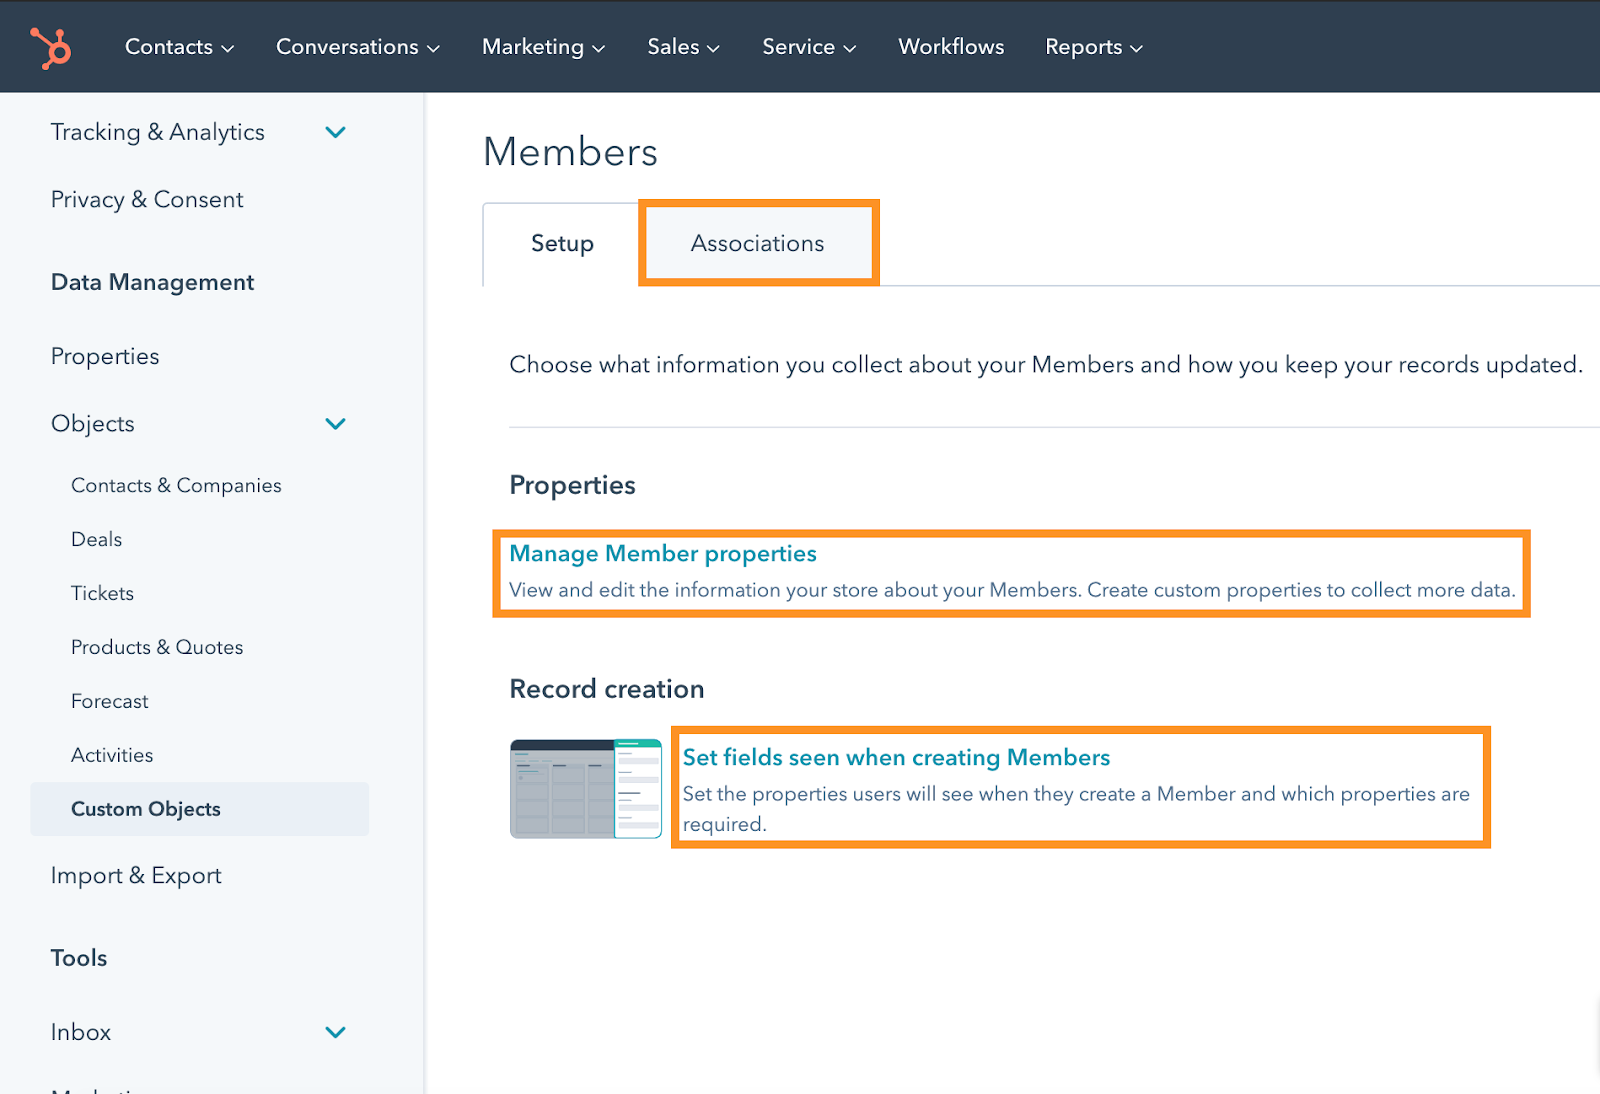
If we jump back to our Settings, and head back to our Custom Objects tab, we can now see that we’re able to create and manage accompanying properties, set required fields for creating a new member, and make further edits to the object’s associations.
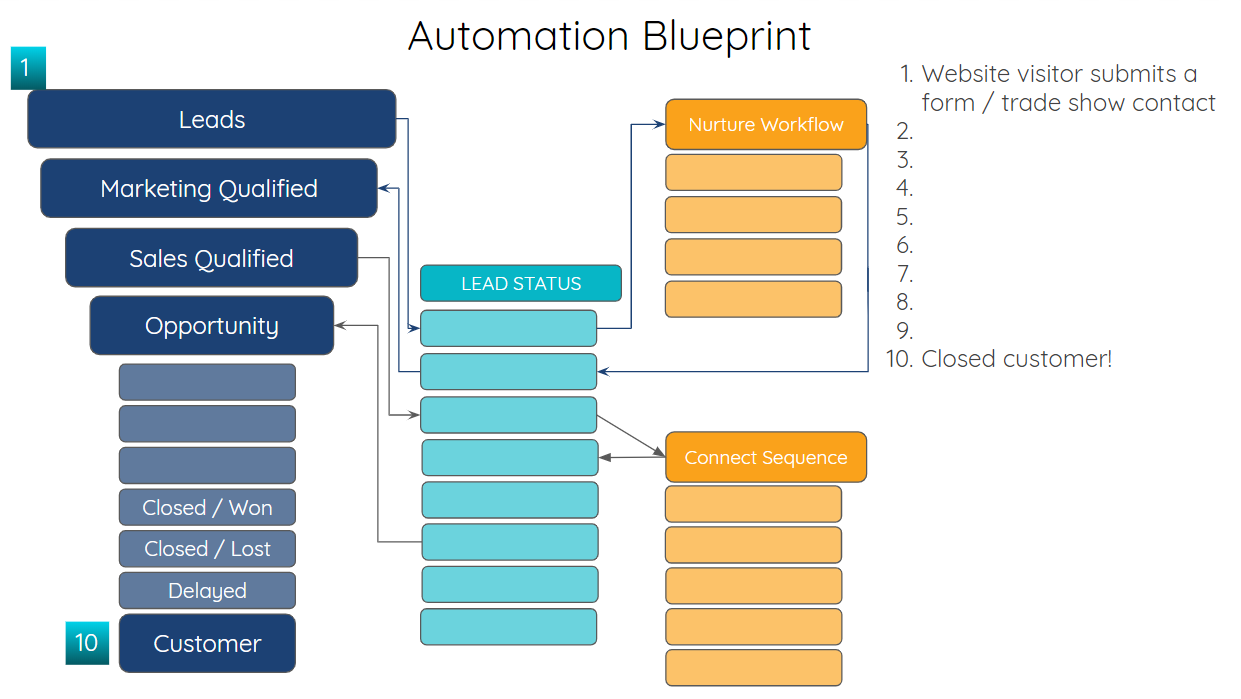
Create a Visual Pipeline for Your Custom Object
After you've created a custom object, you can add a visual pipeline, to clearly show your process in a deal board like view. This can be helpful as you incorporate your custom object into your automation blueprint and determine how it influences HubSpot Lifecycle Stages and intersects with your sales and customer success processes.
It’s as easy as that! Feel free to leave any questions or thoughts in the comments below.
Need Help Creating a HubSpot Custom Object?
Book a 90-minute consultation and workshop session now for $399.